BLOG
PRACTICE - STRATEGY - PHILOSOPHY - QUICK TIPS - AVOID THE BURNOUT - FUNZIES
 Collecting data for your evaluation can become student driven and process inclusive. Collecting data for your evaluation can become student driven and process inclusive. About 7 years ago, there was a shift in how educators in Illinois would be evaluated, and the state moved to the Danielson Framework. 80% of the teacher evaluation would come from this framework, while 20% of your individual teacher evaluation be comprised of student growth. At that time, it was determined that individual districts would be able to decide how or where the additional 20% of student growth for this overall assessment evaluation would be collected, given a few options. Some districts decided that this growth should be tied to the individual teacher (if your particular students demonstrated growth or not), while other districts, like the one I work for, decided that student growth would be tied to the school's overall state mandated SAT scores, which in theory holds the entire school accountable for student learning, or in this case demonstrating standardized growth measured by a for-profit group. This is not to say that I’m making any judgements here (cough cough). But, turn back time those 7 years ago when the districts were still looking at which data to inform where student growth should be measured. I could say that that was truly when I started thinking about student growth in a larger sense. As I’ve spent the past 5 years exploring TAB (Teaching for Artistic Behaviors) and developing Choice in my classroom, I decided it was time to dig in to collecting authentic evidence of student growth, because regardless of what the evaluation stated, student growth was truly what I was most interested in anyway. At that same time, our school went 1 to 1, each student receiving a Chromebook, and while CANVAS (our learning management system- LMS, which seems to be similar to Google Classroom) had existed prior, now our school was moving lightening speed into the world of technology. Perfect timing! As always, there are a thousand ways to do this that may work best for you, and if we wait 5 more minutes, something new and better will be out there to use. In the meantime, here are a few that we have tried. Q: What are some ways that we can use technology to document evidence for student growth in our classroom?  STILL SHOTS: iPad, phone, camera, screenshots, Chromebook camera Most students need to know what to document, how to document, and how often to document their process. Since they have their phones on them all the time, the phone is a great resource and students can upload to their Google Drive (with the App), or plug their phones into their computers/chromebooks and upload. Once you give them reminders, or expectations of how often, most students will continue to document on their own… and then post to their Instagram accounts. It’s up to you and the pace of your class as to how often. It also works great when you give the students specific expectations on what you are looking for in their documentation, or what it will be used for (demonstrate how you used repetition in this artwork; ask your peer a question about your work; explain how your chosen materials impact meaning; demonstrate planning through your sketches and research), students do a better job of documenting their process to hit those specific expectations, and not just some random shots. When using Google Slides (see portfolio below) and Docs, students can add these process shots, and actually annotate them with circles and arrows and text, or can screencastify themselves talking about their process shot and link it right in the portfolio. I (Janet) have spent time teaching my kids how to use a DSLR to photograph their work, but honestly, the iphone works great and is all that is really needed at this level, and the kids will just use their phones anyway. DSLR training (in my opinion), for the purpose of documenting artwork other than photography, is a worthwhile “good to know” and not a “need to know” skill. Our classes are semester long, so I really don’t teach DSLR photographing techniques until AP… and even then, I don’t feel like we have time to truly make sure they are getting those documenting and editing skills as they are also trying to assemble their portfolio. There are also really creative ways to create iPad stands with PVC and such (just google it). If you have a class or department iPad (thanks to grants!), you can set one up and have the students document their process or finished works, and then you’ll have all photos in one place. Janet has also created several different types of DIY light boxes and display areas for students to photograph against or in. That’s probably a different post, but if you make spaces for your students to access to document, you’ll find that they will indeed use them throughout their process. VIDEO RECORDING: Done on the chromebooks (there’s no excuse when the district provides- but we have run into quality issues for sure), on their phones, or renting or borrowing video and time lapse cameras from our school tech office/library) students can also use this easy to access option to…
Janet absolutely loves having students take timelapse videos of their process (especially longer processes like a multilayered painting or subtractive carving from a block of plaster). They can quickly review their results and bask in their achievements (from block to… something!). Some students become obsessed and now seem to timelapse all processes and share them on their own volition. To that, Janet says, “mic drop, I’ve done my job.” SCREENCASTIFY Screencastify is an extension/app to allow you to screen-record (I personally use Quicktime as I’m a Mac user). Also a great way to provide feedback to students. You can scroll through a document, and Screencastify can record your feedback, or students talking about their work to walk you through their thoughts. Joy uses screencastify to record the computer screen and the students voice while they are presenting their work in class. She then has a MP4 recording of the students so they can view it to improve their presentation skills and future content in their Sway (see below). This is also a great tool to use when you are making the transition to portfolio assessments. Q: What are some ways to organize the collected process evidence to demonstrate growth? 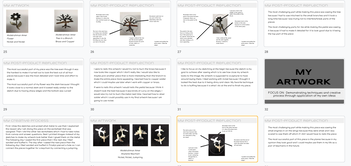 A slice of a student's Google Slides portfolio: documenting process, artwork, annotating for vocabulary and understanding, reflecting on process and product. A slice of a student's Google Slides portfolio: documenting process, artwork, annotating for vocabulary and understanding, reflecting on process and product. GOOGLE SLIDES: Janet: I create a template for my students (they copy and paste) that has required information that they need to include, but I allow them to aesthetically do whatever they want to it. Level 1 templates are more structured (process, end product, specific reflection questions), and by level 3 and 4, I expect them to create a Google Slides portfolio that demonstrates their learning in their own framework. I still have guiding questions and such, but don’t provide an actual template for them to copy. Google Slides can be shared with me directly, where I have them moved them into a folder for that class so I can access at any time. I’ve also made several different submission links on Canvas for them to submit when they are ready, or when I provide an in-progress check. They can also just add to this portfolio each semester as they move into advanced levels, or into other art classes/media. Another goal is to support students who move into AP Studio Art, so that they are used to the process of documenting process, but also then have a collection of past works for their college application or scholarships and we aren’t trying to dig around last minute. In AP Studio Art, student Google Slides portfolios are created throughout the year, building including planning, process, and finished artworks. I keep all of these in one folder, to which all ap students have access to and share. When peer or group critiquing happens, they all have access to just open up their portfolios and create a slide right in the portfolio to comment to that artist. I also love that you can insert recordings, or photos, or whatever to show process. Downside? A lot of times the kids will insert videos from their personal Google accounts and I have to remind them to use their school account, or have to request access, which is just a little bit annoying. BLOGS OR WEBSITES: Joy- I have tried blogs and websites and my students were not into it. I started using Google Sites to create a file for resources and videos but we had a paid platform for the whole school so I was fine with staying with the paid platform. One thing to know is when you create a Google Site the content doesn’t stay year to year. You have to build it over every year. I would have too much content to keep redoing every year. Janet re Google Sites- I don’t use this but have looked into it… another teacher attempted this, but I think it takes up more time to do than is worth. SEESAW: Janet- I’ve not used this, but a lot of TAB teachers use it. My own children’s school/classes started to use this last year. As a parent, I LOVED THIS! I was able to see snippets of what the kids were working on in the classroom, I enjoyed hearing teacher and student interactions, and my kids would send me little learning videos which absolutely MADE. MY. DAY. (Working mom for the win with this app!) But, unfortunately, like all good things that are too good to be true, it lasted about two months, and I never heard a peep from my kids or their teachers again via Seesaw. This app is blocked in our district, and I personally found it not super user friendly on the teacher end of things. But, maybe I’m also just a creature of habit. SWAY: Joy- It is a Microsoft product that works like a “dressed-up” Powerpoint. I have always emphasized to my students to document and show your progress. I tried many different platforms but I have found Sway to be a wonderful way for my students to create a digital sketchbook and documentation of growth that can be made visible or kept for selective viewers only. “Making learning visible is key for reflection.” My students maintain a Sway for the whole semester that starts with the students submitted Artist Proposal. I do recommend that my students create a Sway first and do some searching for concepts/ideas based on a selected Theme. I have a standard based rubric that students have that helps guide the content they curate for each idea they propose. (Use a Google Form for Artist Proposal with a place to insert link to Sway.) Students can use the search bar provided in the Sway link to find content plus they can organize and design the slide layout to suit their style for presentation. Photos, YouTube videos, music, and websites can be uploaded to the link. My students are required to provide written reflections in a text slide in the Sway about the progress they have achieved and what problem-solving they have done and what do they think they need support with or need to change for a future project. *If the student adds you as a collaborator you can use a text slide and comment directly on the Sway link. My students present their Sway to the class and show the digital portfolio as a tool to explain and show the techniques, progress, and outcome. When the semester is complete the student has a portfolio to use for future references and technique building. I also like this platform because my students can share a link on college applications or share on social media platforms if they so choose. *side note I use screencastify (see above) *If the students use the school email to set this account up they will lose access to the links after they graduate. I recommend they copy the entire Sway and send it to their personal email or begin using their personal email. (Sway has a Copy option that sends the link to a selected email) This is their content and should be able to have control and access to it at anytime. Many of my graduates continued to use their content in college and impressed colleges when they shared the links they established that demonstrated their research, process, growth, and reflections. However YOU decide to document process, you will find a million options out there and you will have to figure out what works best for you and your students. Regardless of how you document, this data is so beneficial: it's eye opening to students to see their own growth, it's a fantastic start to showing your community what happens in your classroom, and it will support your students in their learning process as to WHY the make the choices they make. Remind your students and engage your community with how hard your students work in your classroom, to provide their amazing end products for consumption. What ways do you document your student’s processes?
Comment below to share in the dialogue!
19 Comments
9/12/2022 03:47:53 am
Really informative article, I had the opportunity to learn a lot, thank you. https://odemebozdurma.com/ 9/30/2022 06:29:33 am
It's great to have this type of content. Good luck with your spirit. Thank you. https://bit.ly/site-kurma 10/5/2022 06:51:39 pm
I follow your posts closely. I can find it thanks to your reliable share. Thank you. https://escortnova.com/escort-ilanlari/ordu-escort/catalpinar-escort/ 10/6/2022 02:51:54 pm
I support your continuation of your posts. I will be happy as new posts come. Thank you. https://escortnova.com/escort-ilanlari/bilecik-escort/ 10/7/2022 12:55:20 am
I think the content is at a successful level. It adds enough information. Thank you. https://escortnova.com/escort-ilanlari/tekirdag-escort/kapakli-escort/ 10/7/2022 11:19:01 pm
Thank you for your sharing. I must say that I am successful in your content. https://escortnova.com/escort-ilanlari/tokat-escort/erbaa-escort/ 10/8/2022 12:46:54 pm
Thoughtful and real content is shared. Thank you for these shares. https://escortnova.com/escort-ilanlari/erzurum-escort/cat-escort/ 11/24/2022 07:54:46 am
Tıkla evde calismaya basla: https://sites.google.com/view/evden-ek-is/ 12/11/2022 11:23:37 pm
kaliteli düşmeyen takipçi satın al: https://takipcialdim.com/ 12/17/2022 04:34:01 pm
takipci satın almak için tıkla: https://takipcim.com.tr/ Leave a Reply. |

 RSS Feed
